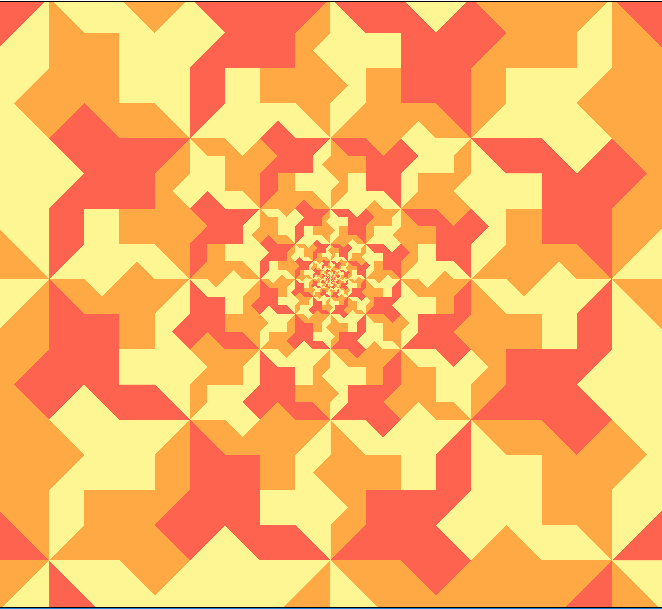
Building Escher's Square Limit in Pixels
I’ve been fascinated by M.C. Escher’s “Square Limit” print for a while. In the hopes of understanding it better I decided to try to generate my own square limit images. Drawing a Square Limit was done as early as 1981, more recently in Julia, using a functional approach. I didn’t find these methods satisfying, partly because they relied on directly drawing each motif iteratively, even if they are using the symmetries of the piece.
I built a way to render square limits with a GLSL fragment shader and in this post I’m going to walk through most of it and explain how it works. For a shader primer, check out the Book of Shaders. The important thing to know is that to write a fragment shader, you build a function that takes a location (in our case, of a pixel) and returns a color. All the code here is “live”, though changes you make in each box will not cascade down to the subsequent ones- it’s not a proper live coding environment. A full version of the code is linked at the end.
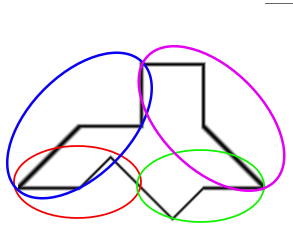
To start, we’re going to to the fiddly bit, drawing the motif itself. I’m going to use a simplified motif of a bird borrowed from David Bailey. Looking at the simplified motif, it’s more clear what symmetries exist. I’ve circled the four regions of the border that are related by by scaling, flipping, and rotation. The most flexible way to draw the motif is to exploit these symmetries.
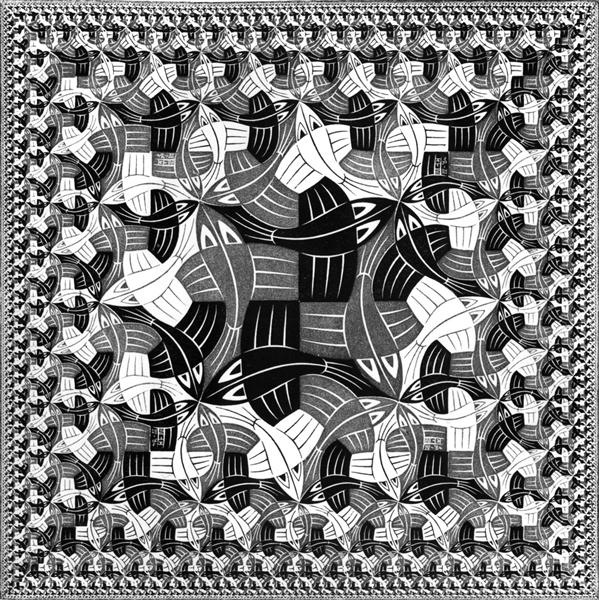
If you look closely at the original print, you’ll notice that while it looks like one motif scaled and rotated many times, there are actually regular distortions in the shapes of the fish. For instance, where three fish come together, the fins are adjusted so they have threefold rotational symmetry, rather than coming together in a T shape. My square limit doesn’t accurately capture these, but then neither do any of the other computer-generated square limits that I’ve seen. The way mine is drawn, it would not be too hard to manually adjust the motifs in these places but I’m going to leave it for the future.
First, we draw one of the marked regions. It may not be immediately obvious why this draws a bump. It’s just $y = -|x+.5|+.5 $ rewritten as an implicit formula so we can assign each pixel a value directly.
Next we need to rotate and scale this shape three more times to form the bird shape. The shapes are composed together using min, which may seem strange at first glance. The edge of our shape is defined by $f(z) = 0$. If $h = min(f,g)$, then $h(z) \leq 0$ when either $f(z)$ or $g(z)$ is. And on the other hand, $h(z) > 0$ if and only if $f(z) \gt 0$ and $g(z) \gt 0$. So the shape we see after composing them with min is the intersection- a logical AND- of the two original shapes. We’re carving the plane into two regions, one inside the bird and one outside.
Now we can build the three-bird square that is the heart of the image. This needs to be drawn various times with various different colors, so this function takes parameters to adjust which colors are drawn.
Now, we’re going to switch gears. We don’t want to draw every single bird by hand, so we’re going to zoom out to look at the whole design. In a previous post, I found a transformation that will “shatter” a square tile into an infinite regression inside a large square; see the last example in that post to understand how it works better. You can also play with the transformation in the Desmos online graphing calculator.
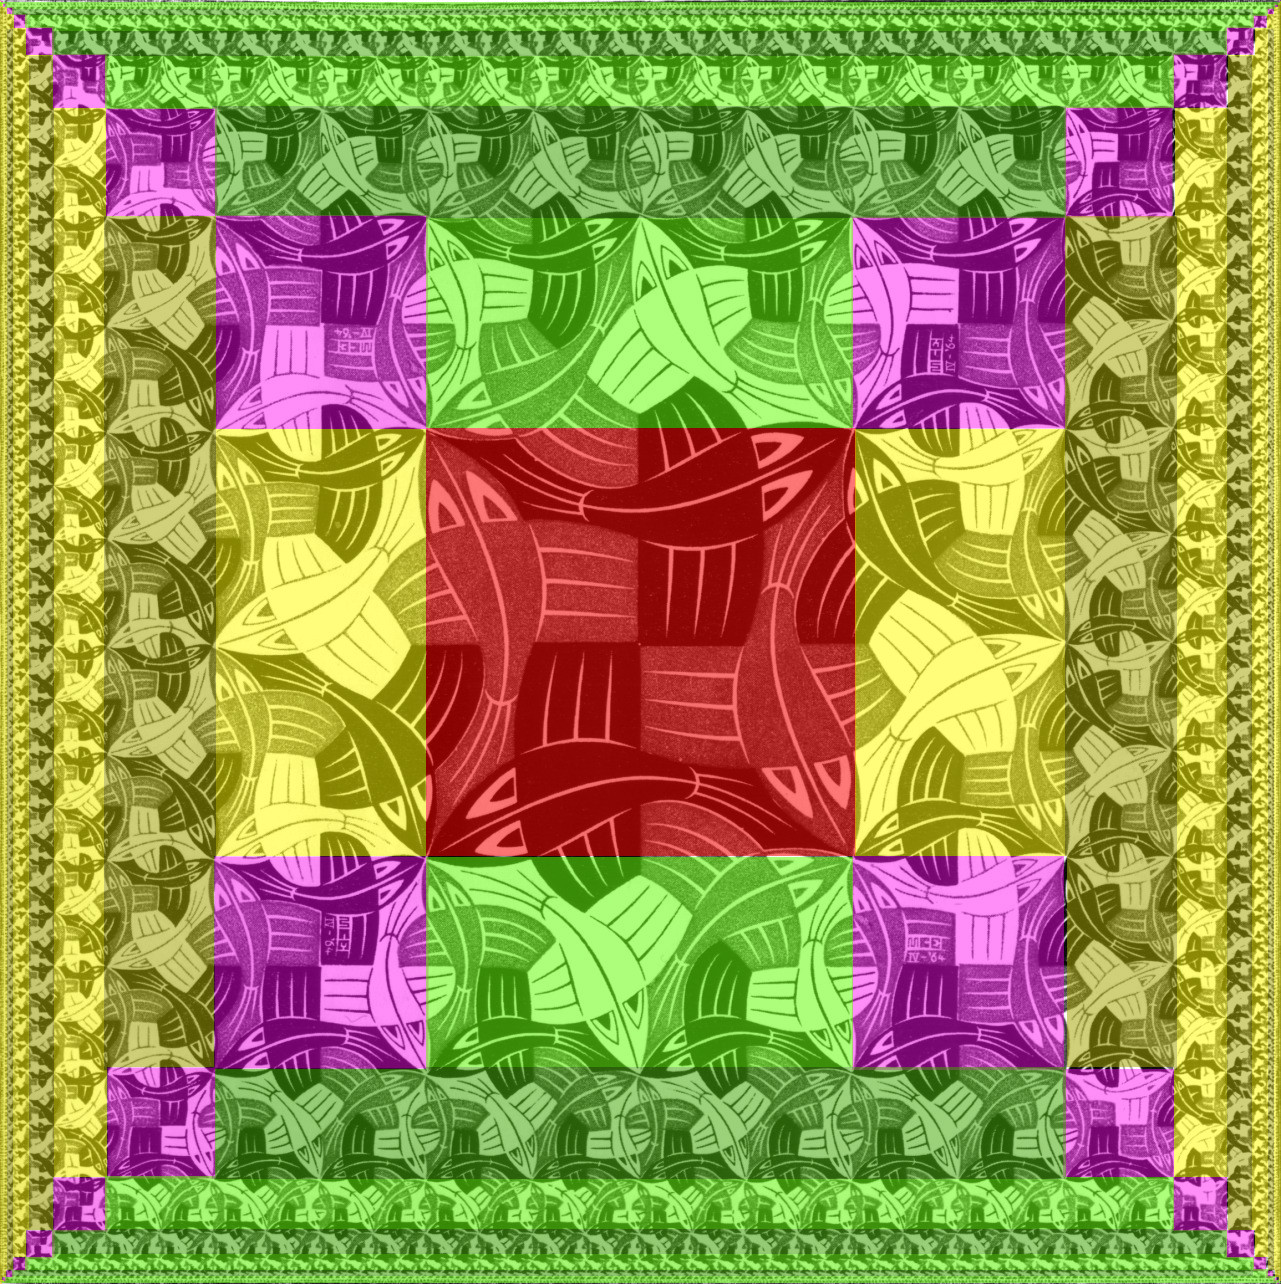
Rather than draw the same tile at each scale, to draw a proper square limit, some of the constituent tiles are going to necessarily be different from each other. At the center, for example, four motifs come together; along the diagonals, four motifs come together as well, though the coloring is different.
To orient ourselves, we’re just going to start with the scaling-transform and mask off each of the regions. We calculate the scaling factor twice, once in the $x$ and once in the $y$ direction. The magenta squares lie where the scaling factors in both directions are equal. The square in the middle has a scaling factor of two, so we will color that red with a special case. The green and yellow regions are distinguisable by which of $x$ and $y$ are greater.
Here’s the center tile. The corners of the “diamond” will get cropped down into a square flush around the central four birds. Four birds around the edge appear to be superfluous, but with a different motif they won’t be, so it’s much easier just to leave them in.
Next, the corner tiles. They’re pretty fiddly, because they have two color schemes. I’m not sure there’s any way to talk through the code that will make it more clear, so I’m going to show it as-is. It stamps two three-bird squares, and four individual birds to make up the other half.
Now the corner tiles can slot into our big square. Notice that the corner tiles on the bottom half need to be rotated 180 degrees around, compared to the top half. The entire print actually has 180 degree symmetry, so we can exploit this to create a copy of the entire top half on the bottom by modifying the coordinate system before we draw anything.
On the sides, instead of using a square tile, we use a rectangular one consisting of two three-bird tiles. As usual, we fill in the immediate neighbors around the edge.
Now we can drop the side tiles into our big square, and out pops the square limit!
Feel free to play with the complete source code [in the editor](http://roy.red/editor/#/shaders/square limit-5.frag). One thing to try changing is the motif- there are probably some more interesting ones!
And a bonus: this method can easily be adjusted slightly to produce an analog of another Escher print, “Smaller and Smaller”. Check out the source code in the editor here.
 Infinite Regression: Many Pictures From One Function
 Drawing fractal Droste images
 Fun with interference patterns